14 years ago
Round ornament tutorial
This is a tutorial for the round ornament pictured above.
Things you will need:
Stitched ornamentd
Design a button
Scissors
Thread
Needle
Backing Material
Lace
Straight Pins
1. Cut into a circle 1" or so larger than the design a button mold.
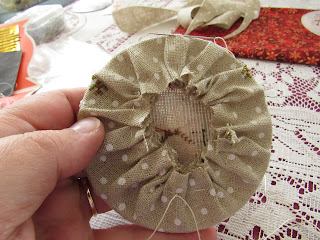
2. Take a running stitch 1/4" to `/2" from outside edge of ornament.
3. Pull both ends of the thread together and gather the material around the mold and tie the ends together, it doesn't need to be really tight.
4. From the front, slide the fabric around the button until centered the way you want it.
5. Begin lacing the back, starting on the edge and take a stitch on the other side of the circle, then work around the edge keeping the thread taught until you have worked all the way around the edge. The fabric should be stretched tight now and centered the way you like.
6. Repeat steps 1 - 5 for the back using the backing material.
7. Using straight pins, pin the lace and the hanging trim in place. Check from the front to make sure the lace and hanging trim are where you want them to be.
8. Using a running stitch, sew the lace and hanging ribbon in place.
9. Sew the back to the front using a whip stitch.
10. Hang your ornament and enjoy!
Subscribe to:
Comments (Atom)


6 comments:
Fabulous tutorial, thanks x
I agree with Julie! :D
Great tutorial and I'm sure I could adapt it to use card circles.
Absolutely lovely!!! Thanks so very much for sharing. On to stitch my ornaments while eating my Moon Pies :-)
Using the design a button rounds is brilliant! I was wandering around the craft store the other day looking for something I could use for a few round ornaments, and left with nothing LOL ~ I think I actually even have a few of these button sets in my craft storage! Totally having a why didn't I think of that moment over here.
Wonderful tutorial Deb! I will try to some round ornaments for 2021! Sally S
Post a Comment